Gnome bread.
Baking has always been a way for me to get creative, and this sourdough gnome bread is the perfect example of mixing fun with flavor. I wanted to try something a little different—something whimsical that could brighten up any table. After all, who doesn’t love a little surprise when it comes to food? Whether it’s a family gathering, a special occasion, or just a simple way to make someone smile, this adorable little gnome loaf is sure to steal the show! It’s not only a fun project to make, but it also adds a dash of charm to any meal. Plus, the best part is that it’s made with delicious, homemade sourdough, so it’s as tasty and gut-healthy as it is cute!
This is a pinnable post. Tap or hover over any image in this post to pin to your Pinterest Boards.
My Go-To Ingredients for a Perfect Sourdough
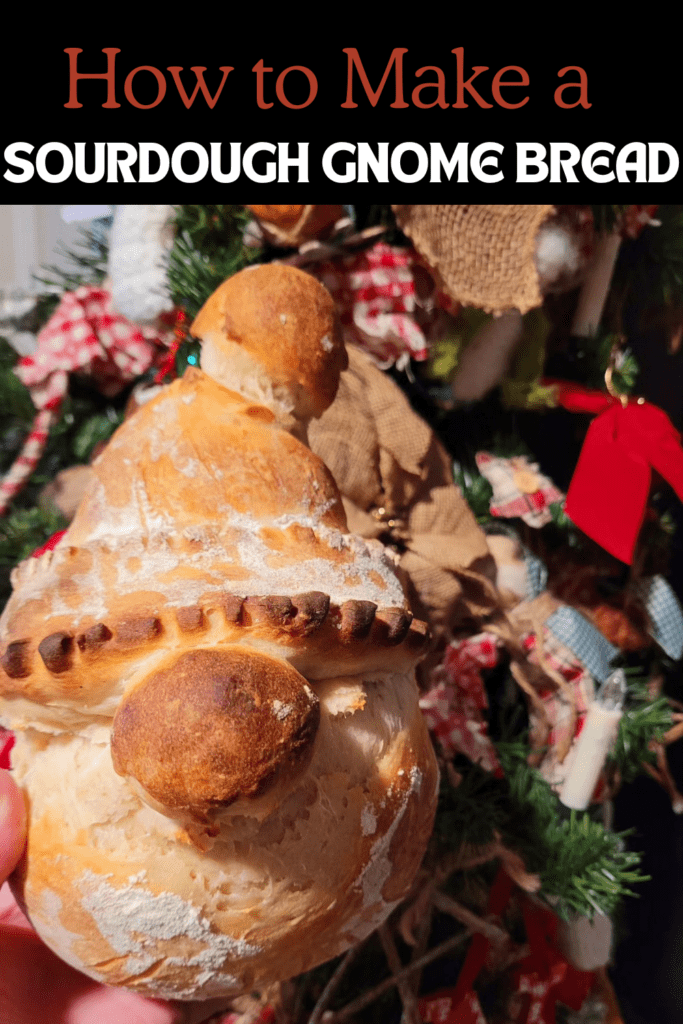
Simple Ingredients for a Wholesome Bread
When it comes to creating this sourdough gnome bread, the ingredients are refreshingly simple. All you need are a few pantry staples: sourdough starter, water, salt, and bread flour. It’s the beauty of sourdough—no fancy additives or preservatives, just natural goodness that transforms into a delicious, tangy loaf.
The combination of bread flour ensures a nice chewy texture, while the water and salt bring everything together. What I love about this recipe is that it keeps things straightforward without sacrificing flavor or creativity. Sometimes, less really is more!
The Importance of an Active Sourdough Starter
One of the most important tips I can share with you when making sourdough bread is to use an active, bubbly starter. The starter is the heart of sourdough, and the quality of your bread really depends on it. When your starter is fully active, it will give the dough the rise it needs and develop that signature tangy flavor.
I always make sure to feed mine the day before I plan to bake so it’s nice and bubbly. A lively starter means the dough will ferment beautifully and produce a light, airy texture that’s perfect for shaping your gnome. Trust me, your gnome bread will bake perfectly for you when using a well-fed starter!
Why Egg Wash and Flour Are the Final Touches
Now, let’s talk about the finishing touches that make this gnome bread so special: the egg wash and flour dusting. Brushing the dough with a whisked egg before baking gives it that gorgeous golden color and glossy finish, which is just perfect for a whimsical loaf.
The flour dusting adds a bit of rustic charm and texture, making it look like something straight out of a storybook. I love the light scoring on the body and the hat too—it’s subtle but adds a personal, artistic flair to your gnome. These little details not only enhance the appearance of the bread, but they also give it that extra bit of character and charm.
Preparing the Sourdough: My Hands-on Experience
Combining the Ingredients and Kneading the Dough
The first step to creating this sourdough gnome bread is combining the simple ingredients. In a large bowl, I mix together the bubbly sourdough starter, warm water, salt, and bread flour. I love how easy it is—just dump everything in, and give it a good stir until a shaggy dough forms. The texture might feel a little rough at first, but don’t worry, that’s totally normal! The real magic happens when you move on to the kneading.
From Shaggy to Smooth: The Magic of Kneading
Flour your surface! As you knead, the dough will slowly come together, becoming smoother and more cohesive with every fold and push. It’s one of those simple, satisfying moments that make me appreciate the art of breadmaking.
Now comes the fun part—kneading! At first, the dough will feel rough and uneven, but as you work with it, you’ll notice it slowly transform into something much more refined. With each stretch, fold, and turn, the dough becomes smoother, elastic, and soft. It’s honestly one of my favorite parts of baking—watching the dough come alive. As you knead for about 8–10 minutes, it’s like the dough starts to stretch and breathe, feeling less sticky and more pliable.
It’s such a satisfying process, and you’ll know when it’s ready because it’ll pass the “windowpane test” (you can stretch it thin without it tearing and see through it). Trust me, when you see the dough go from shaggy to smooth, you’ll feel like a true breadmaker!
Fermenting Overnight: The Key to Flavor and Texture
One of my personal tips for this recipe is letting the dough ferment overnight. It may take a little patience, but the results are absolutely worth it! After kneading, cover the dough with a damp cloth and let it rest at room temperature for 6–8 hours or overnight. Allowing the dough to ferment slowly helps develop the deep, complex flavors that sourdough is known for. I love the subtle tang that comes through after a longer fermentation period.
Plus, the dough’s texture improves too—it becomes lighter and airier, making it easier to shape and giving the bread that perfect chewy bite. This is the secret to creating a beautiful, flavorful sourdough gnome bread that’s truly a labor of love.
Bringing the Gnome to Life: Shaping the Dough
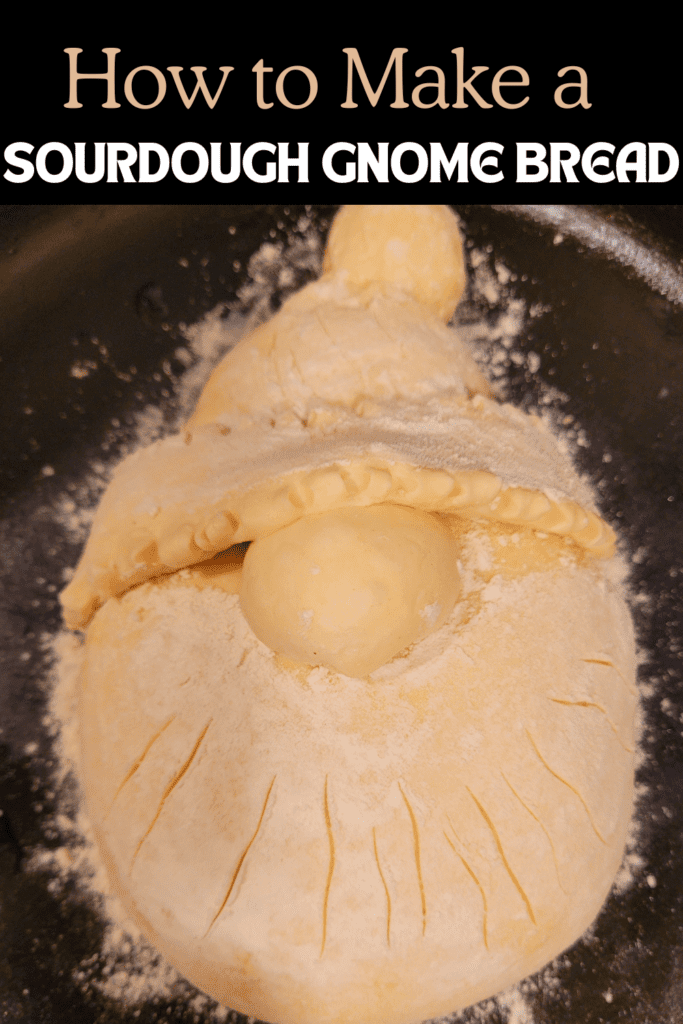
Shaping the Dough: Crafting a Little Gnome
Shaping the dough to bring my sourdough gnome to life was like crafting with my hands—transforming a simple ball of dough into a charming little character. There’s something so fulfilling about molding the dough into shapes, and I treated it like a mini sculpture project. As I worked, I could feel the dough responding, becoming more pliable and ready for the fun process of giving it personality. I love how the dough itself guides you—it almost feels like it’s telling you what shape it wants to take!
The best part is that with just a few easy steps, you can turn a humble batch of sourdough into a whimsical loaf that’s sure to make everyone smile. It’s a perfect example of how baking can be both an art and a science!
Step-by-Step Shaping: The Hat, Brim, and Nose
Shaping the gnome’s hat, nose, and body was where the real fun came in. I started by dividing small sections of the dough for the hat, nose, and brim.
The Gnome’s Nose
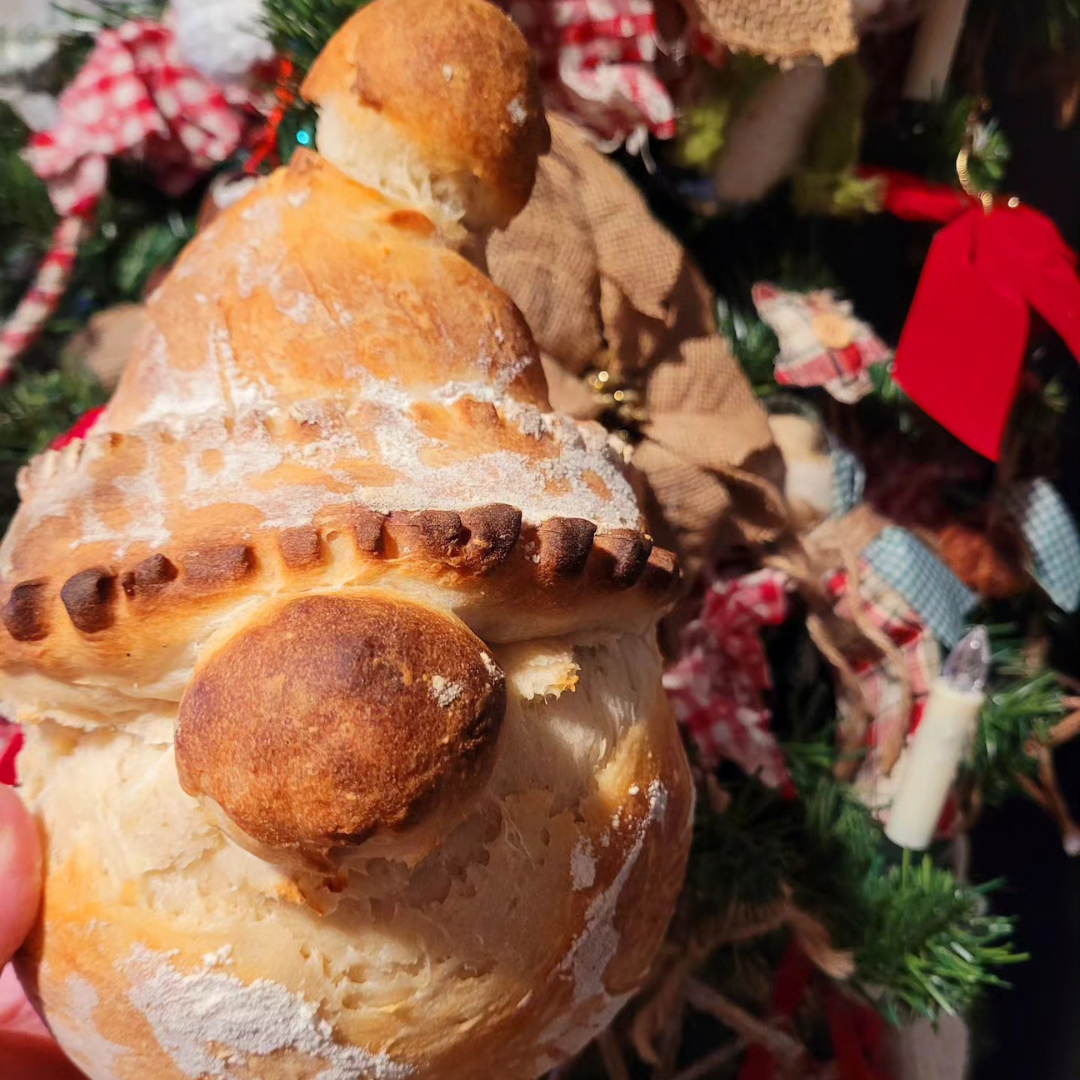
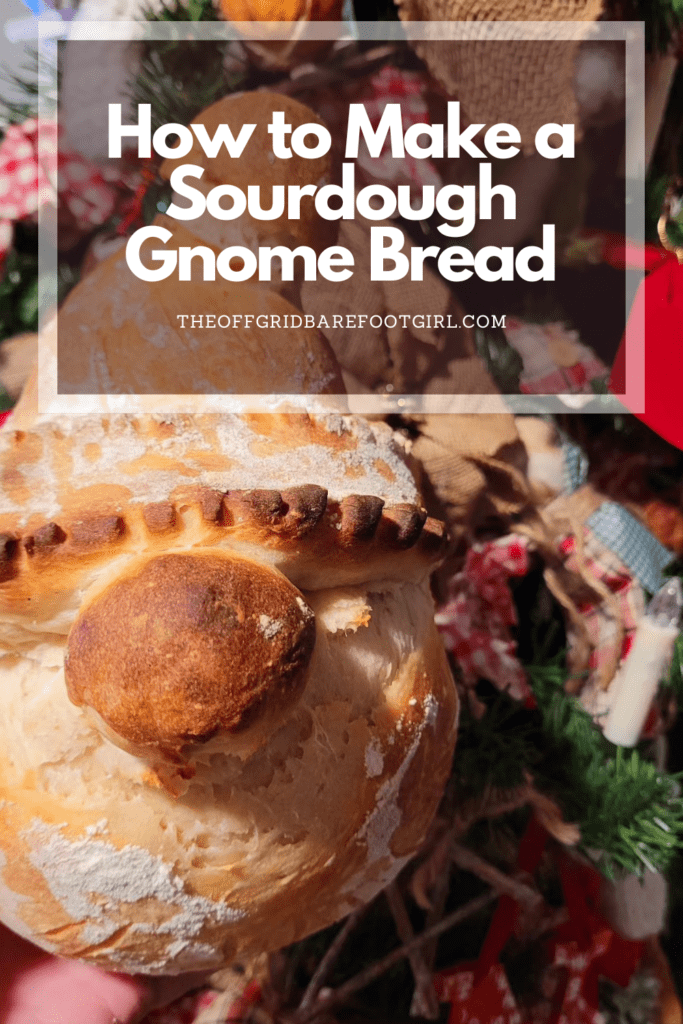
First, I rolled a small portion into a smooth ball for the gnome’s nose. I attached the nose ball to the center of the gnome’s face with a bit of water, making sure it looked snug and cute.
The Gnome’s Hat
The Ball of the Hat
For the hat, I wrapped the top part of the dough with my palm and carefully squeezed and shaped it into a cone. I wanted it to be tall and pointy, but still have that soft, rounded feel. I then added a small portion of a rolled piece of dough at the top of the hat.
The Brim of the Hat
For the brim of the hat, I rolled out another portion of dough into a flat rectangle and draped it over the gnome’s nose, tucking it behind his head to form the brim.
The Gnome’s Chubby Body
To add my personal touch, I made my gnome extra round, giving him a chubby belly and a more jolly appearance. It was all about making him feel full of life, like a little doughy friend ready to bake! Fluff his belly/beard into a round shape.
Adding Details and Baking Magic
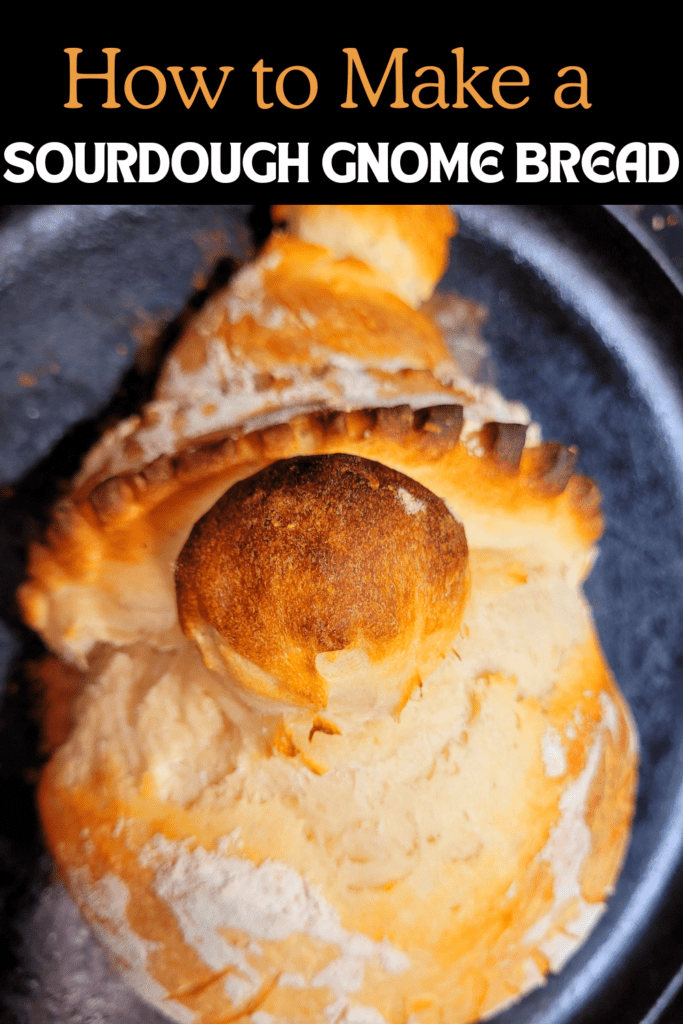
Decorating My Gnome: Adding Whimsy with Egg Wash, Flour, and Scored Lines
Decorating my gnome bread was the perfect way to add some fun personality to this whimsical loaf.
The Egg Wash
First, I brushed the entire gnome with a smooth egg wash. This simple step made the bread shimmer with a beautiful golden glow as it baked, giving it that magical finish. I also add a spritz of water all over the gnome after applying the egg wash for a blister effect (this step is optional).
The Light Flour Dusting
I then lightly dusted the gnome with flour, which not only created a soft, rustic look, but also highlighted the curves and folds of his little hat and beard.
Scoring the Beard
But my favorite part was scoring the lines. I used a sharp knife to make gentle squiggle patterns under his nose for the beard and across the brim of his hat. The lines weren’t deep—just enough to create texture and bring out the details of the gnome’s face. It felt like adding the final artistic touches to a fun little creation, giving him a charming character that was ready to rise and bake into something special!
Tips for Baking the Perfect Gnome Bread
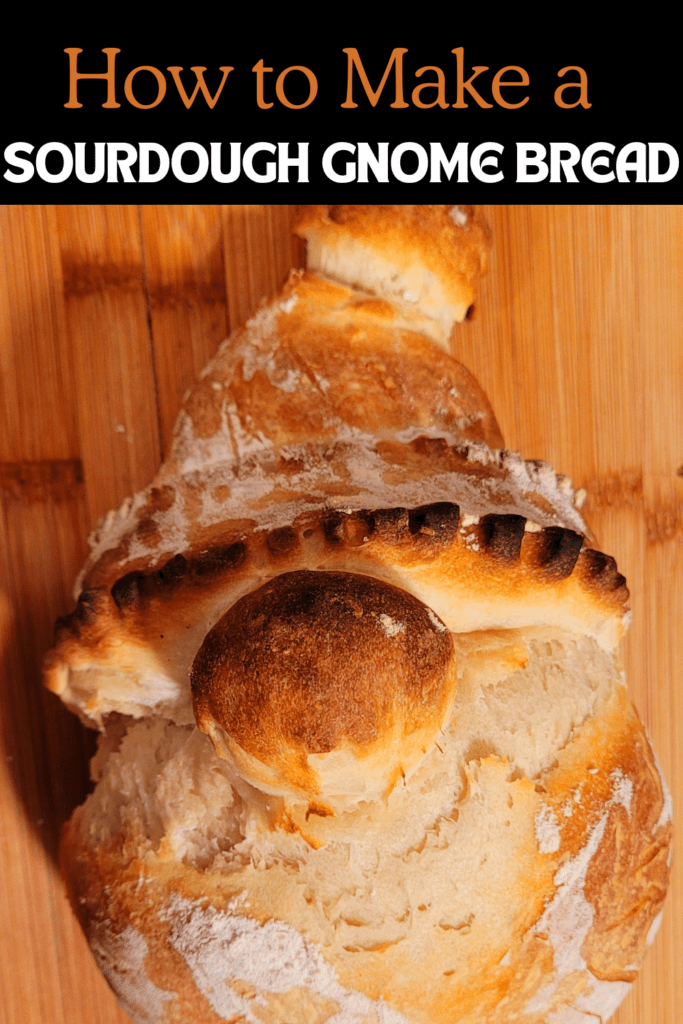
Baking the Gnome
Baking the gnome bread to golden-brown perfection is where the magic really happens. I preheated my oven to 450°F, ensuring it was nice and hot before popping my gnome inside. To achieve that perfect, golden crust, I made sure to watch the bread closely during the last few minutes of baking. The gnome will take about 30 minutes in total to bake, but here’s a quick tip: listen for the hollow sound when you tap on the bottom of the loaf. That’s a clear sign that the bread is fully cooked inside!
If you’re unsure, a quick check with a thermometer can ensure it’s reached an internal temperature of around 200°F (93°C). The result? A beautifully golden, crispy exterior and a soft, fluffy interior. It’s a satisfying and rewarding process to watch the gnome transform from dough to a fully baked work of art!
Conclusion
Why You’ll Want to Try This Too
Bringing Joy to the Table: The Magic of Sourdough Gnome Bread
Making and serving this sourdough gnome bread brought so much joy to my table. There’s something special about baking bread that takes on a life of its own—literally! Watching the dough transform into a cute little gnome, complete with a whimsical hat and beard, and a large chubby nose, made the process so much fun. But the real magic happened when I placed it on the table. It wasn’t just bread; it was a conversation starter, a centerpiece, and a moment of joy all rolled into one!
Every time someone took a bite, they smiled, and that made all the effort worth it. The combination of homemade sourdough flavor with the fun design made it a memorable treat for my family, and I couldn’t help but feel proud of this little bread creation. It was such a wonderful reminder that baking can be both a creative and rewarding experience.
I absolutely encourage you to try making your own sourdough gnome bread and experiment with your designs! The beauty of this recipe is that you can personalize it however you like. Maybe your gnome has a quirky nose, or perhaps you’ll add a fun twist to the hat or beard. It’s a great opportunity to get creative with your breadmaking skills, and I’d love to see what you come up with!
Don’t be afraid to add your own personal touch or try different techniques. Baking is all about having fun and enjoying the process. If you do try it out, I’d love for you to share your creations with me! Whether it’s through a comment, photo, or social media post, it would make my day to see how your gnome breads turn out. Let’s spread the joy of creative baking together!
Resources: Here are some helpful resources for further information.
- Beginner’s Sourdough Bread Recipe – By Farmhouse on Boone
- Sourdough Bread: A Beginner’s Guide – By The Clever Carrot
- Beginner’s Sourdough Bread Recipe – By Little Spoon Farm
Frequently Asked Questions
1. Can I use store-bought sourdough starter for this recipe?
Yes, you can definitely use a store-bought sourdough starter! Just make sure it’s active and bubbly. If you’re using a starter that’s been sitting in the fridge, be sure to feed it 8-12 hours before using it to get it at its peak activity.
2. How can I make my gnome bread extra special?
You can get creative with the design! Try adding details like small buttons or even using colored dough for accents. Experiment with different shapes for the hat or nose, and don’t forget to score the dough for texture before baking.
3. How can I ensure the gnome bread bakes to the perfect golden brown?
The key to golden brown gnome bread is the egg wash! Make sure to brush the entire surface with the egg wash before baking. You can also check for doneness by tapping the bottom of the loaf—it should sound hollow when it’s fully baked.
4. Can I make this bread ahead of time?
Yes! You can make the dough the night before and let it ferment overnight in the fridge. The slower fermentation will develop even more flavor. Just shape and bake the bread the next day for fresh, delicious gnome bread.
Sourdough Gnome Bread
Ingredients
For the Sourdough
- 1 cup sourdough starter, fed and bubbly
- 1 cup warm water
- 1 ½ tsp salt
- 3 cups bread flour (plus extra for dusting)
For the Decorations
- 1 large egg, whisked (for the egg wash)
- 2 tbsp flour
Instructions
Preparing the Dough
- In a large mixing bowl, combine the bread flour, sourdough starter, water, and salt. Mix until it forms a shaggy dough.
- Knead the dough on a floured surface for about 8–10 minutes until smooth and elastic.
- Place the dough in a bowl, cover it with a damp cloth, and let it ferment for 6–8 hours (or overnight) at room temperature until doubled in size.
- Place the dough that is ready for shaping onto a parchment-lined baking sheet.
Shaping the Gnome
- Remove 3 small equal portions of the dough for the ball of the hat, his large nose, and the brim of his hat.
- Carefully shape a cone hat at the top, leaving his body fat and round. To do this, squeeze a palm-sized portion into a cone with your hands at the top and try keeping his body fat and round.
- Roll 2 of the small divided portions of the dough into a smooth ball, like making rolls, which is what they will be.
- Using a bit of water, attach one of the balls to the top of his cone-shaped hat and the other to the middle of his face.
- Take the last small divided portion and roll it out into a long flat rectangle that will fit over part of his nose and tuck behind his head. This will create the hat.
Decorating the Gnome
- Brush the gnome with the egg wash and spritz the gnome with water and lightly dust it with flour.
- Lightly dust the gnome with flour.
- Lightly score the beard with faint squiggle lines down the body under his nose.
- Do the same with part of the hat. Do not make the lines deep.
Baking the Sourdough Gnome
- Preheat the oven to 450 degrees.
- Bake the gnome bread for 30 minutes or until golden brown and hollow-sounding when tapped.
Cooling the Gnome Bread
- Allow the gnome bread to cool completely on a wire rack before serving. This charming loaf is sure to delight as a centerpiece or a tasty treat!
Summary
I hope I have inspired you to bake your very own bread loaves to enjoy and share with your friends and family.
If you were encouraged by this post, I invite you to check out my FREE Printables Page for fun free printables, planners, and charts.
ENTER MY FREE Printables Page HERE
Here are some more of my bread-making inspiration posts to check out!
The Best Hoagie Buns Recipe Made From Scratch!
Pumpkin: How to Make Chocolate Chip Pumpkin Bread
Sweet Potato Bread: How to Make Sweet Potato Bread
Chocolate Chip Cookies: How to Make Chocolate Chip Cookie Bread
Carrot Cake Quick Bread: How to Make Carrot Cake Quick Bread
How to Make Strawberries and Cream Sourdough Bread
How to Make S’mores Sourdough Bread
July 4th Bread: How to Make a Firecracker Marble Bread Braid
Artisan Bread: How to Make Artisan Bread
Challah Bread: How to Make a 6 Braided Challah Bread
Sweet Bread: How to Make Sweet Bread
Blessings,
The Off Grid Barefoot Girl

