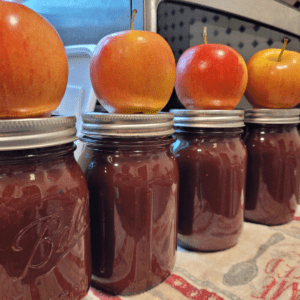
Apple Butter In Crockpot
Discover the joy of making and canning your own apple butter with this easy crockpot recipe. This slow-cooked delight transforms fresh apples into a smooth, spiced spread that's perfect for toast, biscuits, or as a flavorful addition to your favorite recipes. With just a few ingredients and minimal effort, you can create a batch of rich, velvety apple butter that’s perfect for canning and enjoying year-round. Whether you're new to canning or a seasoned pro, this recipe will guide you through the process of preserving the taste of autumn in every jar.
Equipment
- 1 crockpot.
- 1 water bath canner
- 1 set of canning supplies
Ingredients
- 6 ½ pounds peeled, cored, and sliced apples.
- 1 cup white sugar.
- 1 cup brown sugar.
- 1 tbsp cinnamon.
- 1 tsp nutmeg.
- ¼ tsp salt.
- 1 tbsp vanilla extract.
Instructions
Preparing the Apples
- Peel, core, and slice the apples into small chunks or wedges. The smaller the pieces, the faster they'll cook down.
- Add them to the crockpot along with the desired amount of sugar and spices and vanilla extract.
Cooking the Apple Butter
- Add 1/2 cup of water to help cook down the apples and cover the crockpot with a lid, leaving a small gap for steam to escape.
- Cook on low heat for 10-12 hours, stirring occasionally.
- As the apples break down, use a potato masher or immersion blender to achieve a smooth, spreadable consistency.
- Tip: If leaving it on overnight, put the crockpot on the warm setting to prevent burning since you will not be getting out of bed every so often to stir it unless you are that committed!
Testing for Doneness
- Spoon a small amount onto a plate and let it cool slightly.
- Run a finger through the center. If the apple butter doesn't run back together, it's done.
- If it's still too runny, continue cooking and test again in an hour.
- Once you're satisfied with the consistency, remove the apple butter from the heat and let it cool completely before transferring.
Canning the Apple Butter | Sterilizing the Jars and Lids
- Before filling the jars, you'll need to sterilize them to eliminate any potential bacteria or contaminants. Here's how:
- Wash the jars and lids in hot, soapy water, and rinse thoroughly.
- Place the jars and lids in a large pot and cover them with water.
- Bring the water to a rolling boil, and let the jars and lids boil for 10 minutes.
- Remove the jars and lids from the hot water using a jar lifter or tongs, and place them on a clean towel to air dry.
Filling the Jars
- Use a funnel to carefully pour the hot apple butter into the jars, leaving about 1/2 inch of headspace at the top.
- Run a clean knife or spatula around the inside of the jar to remove any air bubbles.
- Wipe the rims of the jars with a clean, damp cloth to remove any spills or residue.
- Place the lids on the jars and screw the bands on until they're fingertip-tight.
Processing the Jars
- Place the filled jars on the rack in the canner or pot, and cover them with water, ensuring at least 1 inch of water above the tops of the jars.
- Bring the water to a rolling boil, and process the jars for the recommended time based on your altitude,10-15 minutes for pints.
- Once the processing time is up, use a jar lifter to carefully remove the jars from the canner or pot, and place them on a towel or cooling rack to cool completely.
- After the jars have cooled, check the seals by pressing down on the center of each lid. If the lid doesn't flex, it's sealed properly.
- Cool on a towel-lined countertop for 24 hours.